Sunday 27 May 2012

Oh You Fancy, huh?

While I prefer to stick to interior design & DIY projects, I do dabble a little bit with event planning. This past week I was put to work planning my Aunt's surprise retirement party! I had a lot of fun planning the colour scheme, flower arrangements, candy bar (they should be standard for parties!), and all the little things in between. Now I do admit, I've had a little bit of practice over the past year, assisting the lovely and very talented, Andrea Hounsell - owner of the wedding/event planning company Something Borrowed Something Blue.

I'm gonna let you in on a little secret - being responsible for making pretty flower arrangements terrifies me. Anyone else feel the same way?! I don't know what it is, but put some flowers in front of me and ask me to make a pretty arrangement and I panic.

How short should I cut them? 
How do I make them stand in place (cause they always flop over on me!)? 
How many should I put in the vase? 
How many different kinds of flowers should I use? 
My mind just can't stop!

When I discovered a VERY simple way to make a beautiful arrangement I just had to share so that I hopefully help calm down any terrified flower arrangers like myself...

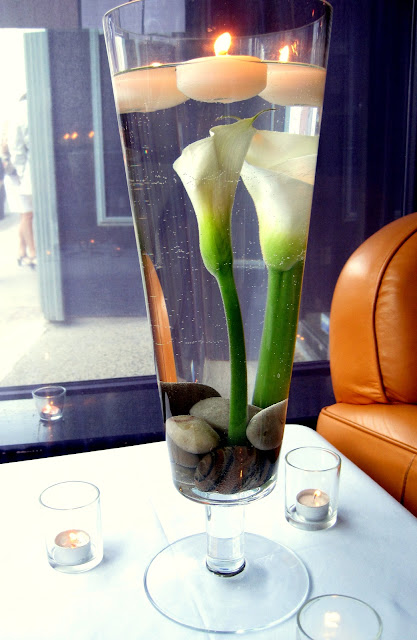
I call it the "Calla Lily, You Fancy Huh" arrangement...(cause it does look kinda fancy!)

flower arrangement


the How To:

  • Two Calla Lilies (or flowers of choice) - just $5.99 for the two from my local supermarket, Dominion
  • River rocks - A bag is about $5.00 from Walmart. You can buy large or small rocks - this will depend on the size of your arrangement (large vase = large rocks, small vase = small rocks)
  • Floating Candles - 6 candles for $6.99 from Bowering (a little pricey, but I couldn't find them anywhere else!). Keep in mind how long you will need the candles for - these were 8 hour burning candles which were just right for our event. 
  • One large or small vase 
  • Scissors 
  • Water 


Step One: Place a handful of rocks in the bottom of the vase. 


Step Two: Cut the flowers so that they sit about 1" to 2" below the top of the vase. Push the flowers in-between the rocks inside the vase so they stay anchored at the bottom. 


Step 3: Fill the vase with water until it reaches the top of the flowers.


Step 4: Lay the floating candles in the water & enjoy! Note: The candles aren't necessary, but are a nice added touch (especially for evening events). 


It's spring and LOTS of flowers are in bloom so you have no excuse. Don't be scared. Go make yourself a pretty flower arrangement!


Bye for now,

Emily Grace
Thursday 17 May 2012

the Painted Vase - Part I

While wandering around Walmart looking for a new lampshade (for a post coming soon!), I stumbled upon craft paint. While I enjoy DIY projects, I'm not so much of a craft person (if that even makes sense?). I couldn't tear myself away from the beautiful colours and for just $3 bucks for a tube of craft paint I thought what have I got to lose? So I picked up some craft paint, found a $2 vase at Walmart and had me a new project.


And for another beauty shot...


Here's how it all went down...


The vase can be big or small. In fact, it doesn't have to be a vase at all. It can be an old milk jug, mason jar, or even a clear plate (that you can later hang for decoration). As for craft paint, I used Martha Stewart's Satin Paint - it sells for about $3 a tube. As for the paint brush, while I show a foam brush in the picture above, I later changed to an acrylic paint brush (nothing fancy, just a cheap one) and that worked much better. I found the foam brush to be too streaky and the acrylic brush to be just generally easier to paint with. 

Step #1: Clean out inside of vase with warm soapy water and dry with a lint free cloth or paper towel. 


If you want to go the extra step, Martha Stewart recommends rubbing down the surface with rubbing alcohol and letting it dry for 15 minutes. I later read as well wiping the surface with white vinegar is even better than washing with soapy water. Depending on your soap, it could leave residue therefore making it harder for the paint to adhere to the surface.

Step #2: Squeeze a blob of paint in the bottom of the vase and start to spread the paint around with paint brush. 

Step #3: Once the full inside area is covered with paint, let dry for about 1 hour

This is what my vase looked like after its first coat. 


NOTE: The first coat will be very streaky so don't worry! 

In between coats give your paint brush a little rinse under the tap with some warm water to keep it clean.


Step #4: Repeat steps 2 & 3 until you can no longer see through the vase and have a solid coat applied. It took me about 4 coats to get to this point.


So I was all done...or so I thought. Until I noticed a little note on Martha's label..."cure for 21 days". What the?! What does cure for 21 days mean?! After some research I found out that means that you have to leave the paint alone for 21 whole days until you do anything to it (ie fill the vase with water). Geez...the label should have read, "Acrylic Craft Paint: Let us test your patience". Anyhow, I thought, hey, what can a little water do? Apparently a lot. Almost immediately it started to bubble. Oopsies. 


It was a surprisingly easy fix. I just peeled back the bubbles and applied another coat of paint and we were back in action! However, lesson learned. I'm going to give it 21 days to 'cure' and see how it holds up to water.

The options are endless with this versatile craft paint! How about customizing some thrift store mugs? Have a wedding coming up? Try painting all the vases to really enhance the colour scheme of your wedding. Summertime always calls for bright colours! Pick up bright orange or yellow colour and try painting an outdoor vase.


Stay tuned for Part II to this post. I'm going to try yet another vase painting experiment, but I will first prime my vase with a surface conditioner. It claims to help the paint adhere to glass surfaces...I'm curious if it will make any difference?! Also, I'm going to try out a different paint that you can bake so the 'curing for 21 days' can be eliminated. Yay for impatience! haha. Stay tuned.

Bye for now,

Emily Grace


Wednesday 9 May 2012

Mirror Mirror On The Wall...(you look pretty)

One particular 'fad' I've been finding myself loving these days are sunburst mirrors (some call them starburst mirrors, either or). I love them! They really add a lot of personality to a room. The mirror can take centre stage or simply act as a nice accessory to add to the overall ambiance of the room.

This one is my favourite!


Credit: House Beautiful 

Credit: Lonny Mag 

Some of you may remember this photo of my bedroom from my post "a Nightstand is Born".


Anyone happen to notice how bare it looked behind my bed!? I did. That's when I decided enough was enough and I needed to get me one of those sunburst mirrors. I headed on over to one of my favourite stores, Home Sense, and one just happened to be staring at me!

BONUS: Did I mention it was just $40?!? Yep. These mirrors tend to be a pretty penny, so I was quite happy with that price. I know I know, I could have attempted to make it myself, however, finding a plain circle mirror to build upon did not fare well for me. I searched high and low for just a circle mirror with a simple edge - no luck. That's when I gave up and went to plan B - buying a sunburst mirror. Now for the reveal...


Instantly this mirror brings the whole room together, acting as a great focal point. It transforms the space and looks pretty (if I do say so myself!).

While this may just be a fad, I'm hoping to stay on the starburst mirror train for as long as I can. Hop on!

Bye for now,

Emily Grace

Sunday 6 May 2012

Crochet for the Home.

For those do-it-yourself folks out there, crocheting is a great addition to the DIY tool belt. I started crocheting about six months ago and since then I've been hooked!

It's a very unique and beautiful way to add style to your home, and it doesn't have to look like it came straight from your Grandmother's house. It can adapt to many different decor styles...

crochet pillow, doily lamp, crochet blanket, crochet dishcloths
Tutorials & Patterns: Pillow, blanket, doily shade, dishcloths (pattern coming soon)

I mean seriously, look at this stuff! It's amazing!

The mama of all crochet projects is this gorrrrgeous rug. Just imagine, people coming into your home asking "Where did you get that beautiful rug from?" and responding, "I made it!". This project is definitely on my crochet bucket list. 

Alpaca Rug tutorial.


Don’t have a clue how to crochet? No worries! There are a ton of really great YouTube videos that can help teach you. Crochet Geek and All Free Crochet are a great start. While you're at it, sign up at ravelry.com to avail of the free patterns and great resources they offer. All you need is a little bit of patience in the beginning (I almost broke down crying during my first lesson, my bad!), but after that it should be smooth sailing! 

Next on my DIY to-do-list are these cute crochet coasters. I'll keep you posted on how that goes...


Go on, get out there and start crocheting!


Bye for now,

Emily Grace