Wednesday, 18 July 2012

a DIY Nightstand: Version II

I'm at it again! Yet another nightstand makeover (sorry, I just can't help myself!).

I've been working very hard with my very first 'client' (ahem...my friend), on her bedroom makeover. We've been taking it one step at a time and I must say the room is really coming together - I'll be sure to post the final reveal once it's complete! For now, I'll show you how we transformed her hand-me-down nightstands into chic pieces.

Remember this picture?


That's one sad looking nightstand, indeed. In fact, there were two of them, one on either side of the bed.

To help save my client some money (and to give myself a fun DIY project) I decided to work a little DIY magic on them. Similar to my first DIY nightstand project, I knew that a little paint and a few handles would whip these dated nightstands right into shape!

I hate when people make you wait until the end to see the results...so here's a little sneak peak at the before and after:


Emily Grace's Nightstand: Version II

Materials Used: 

1. A nightstand (of course!)
2. Sand Paper
3. An old rag
4. Spray Paint
5. Painters Tape
6. Ruler & Pencil
7. Craft paint brush
8. Pulls/Handles

Step I: Sand 

I sanded my surface with 150 Grit sandpaper. The lower the grit number the more course the sandpaper. If I had my time back I probably would have gone with a courser sand paper because the surface was really smooth and needed some 'toughening up' so the paint would stick and not chip. 


Step II: Clean the Surface

This step is super important. It's always important to have a clean surface to paint on. Wipe down your surface with a damp cloth, then wipe it with a dry cloth. 


Step III: Prime it Baby!

I had never primed anything before so I was curious to find out how it would turn out? I discovered that primer a.) helps the paint stick to the surface and b.) smooths out the surface (great for if your table is really scratched up!)... and I'm sure it has many other benefits that I'm not yet aware of! 

Make sure to paint and prime in a well ventilated area. This stuff is lethal...we don't want any fatalities! 

P.S. - Not quite sure about how I feel about this particular primer... I might try something different next time. 


Step IV: Spray Away

After you have allowed the primer to dry (read your label for drying time), you can get sprayin'! (this is the fun part!). TIP: Several lighter coats is better than one or two heavy coats. Here's a shot after my first coat...


I used Rustoleum's Painter's Touch in Flat White. That was my first time using a flat finish, and will probably be my last. Don't get me wrong, I love how the tables turned out, but the flat finish was a lot more 'flat' looking than I had anticipated... if that makes any sense?


Let it dry and... spray again! 


Step V: 'Handle' it. 

Make sure to measure and drill the holes for your handles before your last coat of paint. Why? Because you don't want to accidentally scratch or dirty your finishing coat while drilling the holes. Drill the holes, spray your last coat, DRY, then screw them on. 

Optional: Stenciled Lines

I wanted to add some extra 'oomph' to these tables. So I decided to test out painting some thick lines. I have the greatest TIP so pay attention! 

To ensure your paint doesn't bleed underneath the tape, make sure your first coat of paint is super thin, like feathery thin. This allows the tape to form a firm bond with the surface so that for your second coat you can apply the paint generously and not have to worry about the paint bleeding. This worked like a charm - I just happened to not do that on the first table...uh oh! That was a mess that had to be redone. 


Once again...here is the final result! 


Stay tuned for the big reveal of the entire bedroom! 

Bye for now, 

Emily Grace

Friday, 6 July 2012

Design On A Dime (or two)

Emily Grace is my name, saving money's my game.

I apologize, so cheesy... but hey, I have your attention!

The Thrift Store and Value Village (or 'the Val' as my friend's mom likes to call it) are two of the best kept secrets when it comes to to shopping for furniture and accessories. I first discovered the Thrift Store as a student while hunting for inexpensive furniture for my bedroom. Lo and behold, I found a solid wood dresser along with a mirror and nightstand tagged at just $45.00. Not bad for a poor student!


Here are some of the steals from Value Village that have helped to accessorize my current bedroom dresser:

Thrift Store


Brass candlestick holders. $1.00 each.

Wood jewelery box. $3.00

Silver (or not so silver) tray $1.00.


Check out this silver plated cutlery I found for $60! It came in this really cool retro looking case that I just fell in love with. After doing a bit of research I discovered my cutlery set is a mix of two different patterns - Remembrance by 1847 Rogers Bros. and Spring by WM Rogers & Sons. Both very timeless and elegant patterns.


Last but not least, another one of my favourite finds is this hutch I found for my sister's new home last summer. This piece cost a whopping $35 bucks and she barely had a scratch on her!


Have I swayed you to the 'second hand side' yet? Get on out there and go get yourself some deals!


Bye for now,

Emily Grace

Monday, 2 July 2012

Reader's Request: Bedroom Makeover

BIG NEWS folks. I officially have my first "Reader's Request". While this reader may or may not be a friend of mine, it is a request nonetheless...so it still counts!

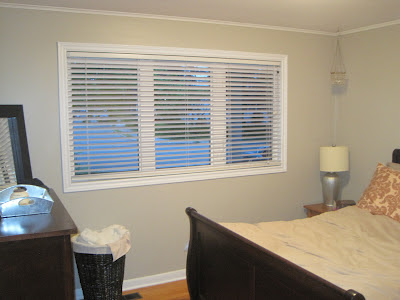
A few weeks ago I was presented with 'Exhibit A - The Bedroom' and was asked to offer my design advice...


Needless to say, this room was lacking colour and personality and felt unfinished and drab. It was time to add some Emily Grace to it!

Elements that really worked in this room were the beautiful hardwood floors and the gorgeous great big window!

The only item that I had to work with in this bedroom was the sleigh bed frame. In my opinion, the bed frame stuck out like a sore thumb. It felt very heavy and dark so in redesigning the bedroom I had to address that little predicament. Don't get me wrong, it is a gorgeous piece of furniture, but in such a small bedroom it just took over the small space. Painting the walls light, combined with the light wood floors would have made this heavy piece feel even more 'large and in charge'... therefore...to dark walls we go.

MOOD BOARD


THE ELEMENTS

1. Sarah Richardson's paint colour Thunderstorm is the perfect colour for this bedroom - it's not too dark, and not too light, just right!

2. While I plan on revamping the existing nightstand, for some inspiration I found this very sleek & contemporary nightstand from West Elm.

3. Adding moulding above the bed and nightstand will add character, charm and warmth.

4. A calm but 'oh so cool' looking animal print rug will give this bedroom some pizzazz (a very technical term, I know). From overstock.com (yes, they ship to Canada!).

5. Two hot to trot 'ikat' pillows found on the wonderful etsy.com will bump up the cool factor in this room and add a well needed splash of colour.

6. The rectangular shade and silver geometric base of this lamp from IKEA is just perfect for this bedroom!

7. Every bedroom must have some fresh flowers. Flowers are an easy and inexpensive way to add a punch of colour. Get bored of pink? Try out yellow!

A side note: I'm a firm believer in keeping the major elements of any room neutral (ie paint on the walls) and using accessories such as pillows, lamps, flowers, etc. to spice it up a little. That way, if you get bored of it, scared of it, or just end up hating it all together, you can switch it out with little effort and keep costs minimal.

Using the magic of Adobe Photoshop (which I am no pro at, so please no judgement!) I was able to create a digital makeover of this bedroom.

The Big Reveal...


A little before and after shot:


Notice how the bed doesn't feel so heavy anymore? Now the room feels much more balanced and calm.

To keep costs minimal I kept the existing bedside tables and opted to paint them white. I added a little gray detail and threw on some sleek stainless steel handles to bring the dated tables up-to-date.

I opted to keep the existing white blinds (for privacy reasons) and added some pleated curtains on a silver curtain rod to add some texture and warmth to the room.


Have a room makeover request?! I'd be glad to help you out! Just e-mail pictures my way and I'll see what I can come up with...emilygracegrace@gmail.com


Bye for now, 

Emily Grace